- Fixed rotator.
- Fixed rotator with steps.
- Quick look at vector graphics textures in after effect.
Fixed rotator.
How to rotate a texture by a certain fixed angle?
Just input a constant value in the time pin of your rotator. The constant value is like saying ‘this is where the rotator would get you in that much time’. (I mean, not technically since the unit is not seconds but it's sort of a way of seeing it.)
What to expect from that value? First thing, set your rotator speed to 1. Then you have to know that unreal uses radians as a rotation unit.
180 degrees = π (pi, the maths symbol equal to 3.14159 and so on).
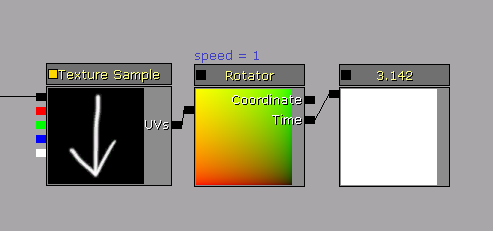
Therefore, 90 degrees is going to be π / 2.
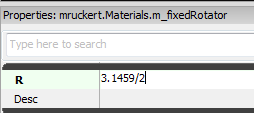
Good thing to know: you can do maths in input fields. In your constant input, you can simply type in 3.14159/2.
Usage.
You could use a fixed rotator to represent a circular gauge for instance. Most likely, the gameplay code is going to provide you with some normalized parameter. (Frankly that’s the best option. Sure modifying the value to fill your needs will add a few instructions but it gives you the flexibility to easily do anything you want with it, rather than having to go bug a coder so he changes the value he's hard coded for you.)
Modify the input to the range you are interested in (say 0 to 90 degrees), plug it into the rotator, and then into a mask that multiplies your gauge.
You’ll notice that I’ve just multiplied my normalised value; since my min is 0, I don’t need to use a lerp which would add more instructions for the same result.
Fixed rotator with steps.
We can go one step further.
In Enslaved, Trip has an emp gauge which recharges over time and is split in several chunks which appear one at a time.

I used a similar setting, with a rotating mask that multiplied my texture, only this time the rotation value had to be contained until it reached the next step.
In the following example our gauge value is at 0.5, that's half filled. The gauge is split into 5 chunks, so each step is 0.2.
We check: our many steps are there in our current value ? That's 0.5 / 0.2 = 2.5. We're only interested in full steps so we floor it.
We've then got two full steps, the step size is 0.2 that's 0.2*2, our output value is 0.4.
The floor node is going to keep the value contained at 0.4 until the next integer is reached. When we get to 3 full steps, the output will suddenly jump to 0.6 and so on.

Credit for this little setup goes to Gavin Costello, currently Lead Programmer at Ninja Theory and full time graphics programming genius.
Vector graphics textures in after effect.
I've got a thing for after effects in general, and I find it excellent for vector graphics in particular. It's very flexible, the textures are easily scaled and iterated. Illustrator could do the same but with after effects you can also animate everything for previs and/or flipbook generation. (Which is exactly how I worked during Enslaved. My previs and textures were the same assets.)
Here's the way I made the previous gauge for instance, using shape layers:

2 ellipses, 6 rectangles, a subtract merge to cut out the inner circle and the rectangles, another rectangle and an intersect merge to extract the bottom left quarter. And finally a white fill of course.

I
like to use expressions even with these sort of very simple shapes. It
is a small time saver as you make the texture and might be a massive one
along the project as you iterate on your texture.

Right there for instance, I link the anchor point to my rectangle size for the anchor to be at the end of the rectangle rather than in the default centre. Sure I could have done it by hand but I find it better when automated. I was a bit lasy in this case so I stopped there but if I had created this texture for production, I would have also:
Right there for instance, I link the anchor point to my rectangle size for the anchor to be at the end of the rectangle rather than in the default centre. Sure I could have done it by hand but I find it better when automated. I was a bit lasy in this case so I stopped there but if I had created this texture for production, I would have also:
- linked the size of every rectangle to the first rectangle (or even neater, to a slider control)
- linked the rotation of every rectangle to a slider control (and multiplied it by 2, 3, 4 etc. for each next rectangle)
- and maybe controlled the radius of each ellipse from a slider parameter too, just so as to modify everything for one single place and not have to open up the content properties
No comments:
Post a Comment